分区-文件系统
前言
这篇博客主要介绍磁盘中的两个重要概念——文件系统和分区。并通过这些概念,理解grub构建启动盘的原理
分区
出于某些原因(如需要多重引导等),磁盘需要被分割成多个独立的分区进行管理
则这些分区信息(被称为分区表)需要被存储在磁盘的固定位置(往往是磁盘起始地址),从而方便其余设备识别分区信息
现在常用的分区表格式有Master Boot Record(MBR)和Globally-Unique-Identifiers Partition Table(gpt)
MBR
MBR位于磁盘的第一个扇区中,其基本格式如下所示
GPT
GPT位于磁盘的前34个扇区,其基本格式如下所示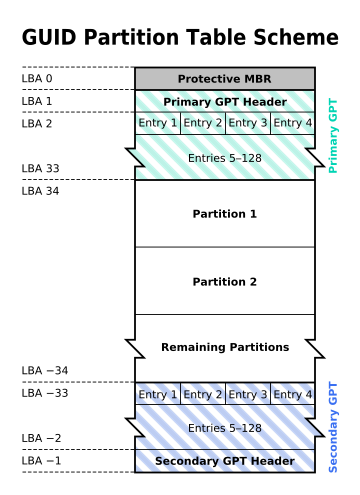
可以看到,其兼容MBR
文件系统
xv6中有一句经典的描述
文件系统又被称为on-disk数据结构
因此,文件系统中,数据在磁盘上的组织逻辑就是整个文件系统的重点之一,其一般布局如下所示
创建一个文件系统,就是创建该文件系统的诸如superblock等的metadata
分区和文件系统
实际上,分区和文件系统的关系并不是非常紧密。分区是解析磁盘的方式,主要解析partition table;而文件系统是解析磁盘数据的方式,主要解析相关的superblock
所以,superblock的管理和partition table的管理,实际上关联不大。换句话说,即使没有磁盘分区,仍然能创建文件系统,如下所示
在挂载的loop设备上,没有分区,仍然可以正常创建文件系统
内核实现
源码之下,了无秘密
这里通过分析Linux内核中,关于分区和文件系统部分的相关代码,更深入了解分区和文件系统的关系
分区
Linux内核中,磁盘分区与struct gendisk、struct block_device相关,其关系如下所示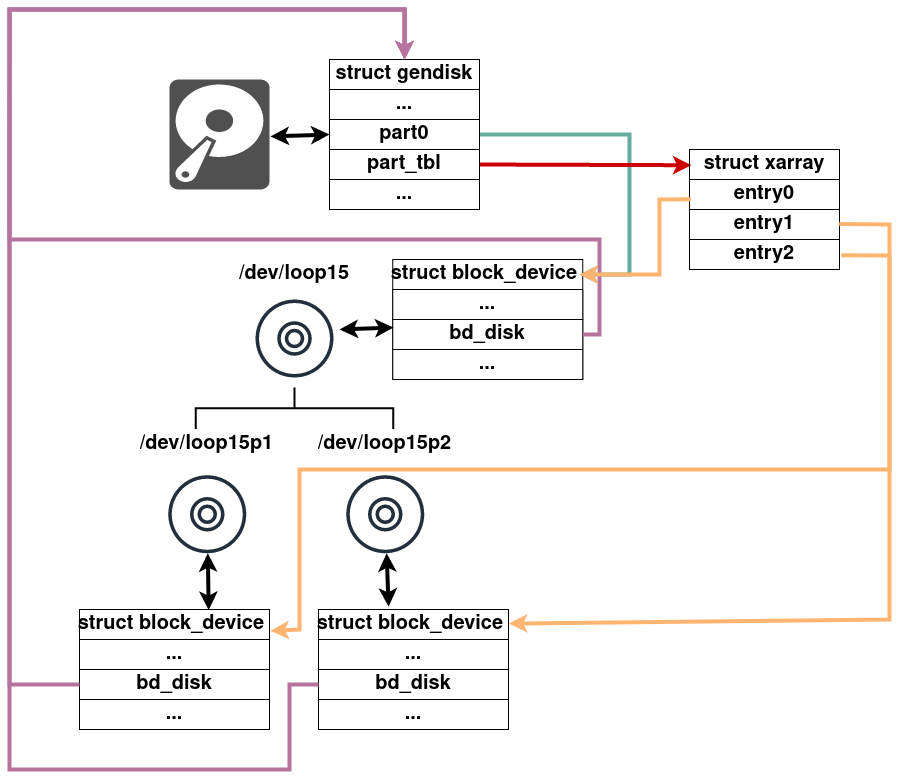
当内核需要解析磁盘内容时,会尝试使用check_partition()函数解析分区,调用栈如下所示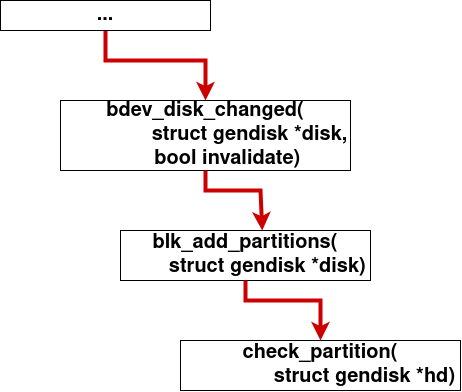
文件系统
Linux内核中,文件系统与struct file_system_type、struct super_block(in-memory数据结构,不同的文件系统有各自的on-disk super block)和struct mount相关,其关系如下所示)](filesystem_struct.png)
当内核需要解析文件系统时,也就是需要进行mount()时,会尝试使用vfs_get_tree()函数,调用回调函数fc->ops->get_tree()去解析文件系统,流程如内核文档所示,调用栈如下所示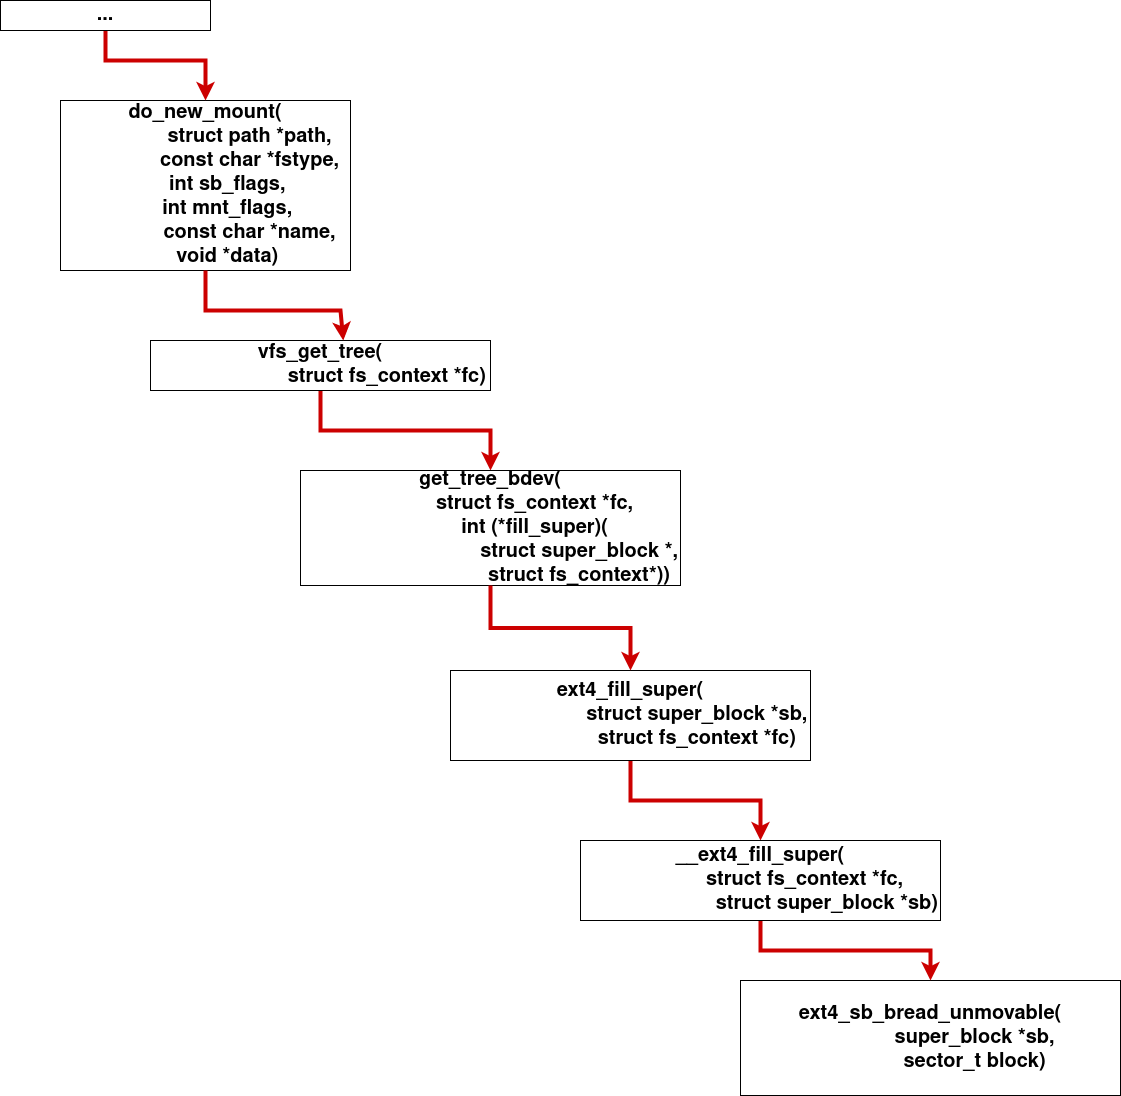
总结
通过Linux内核的相关代码,可以非常清楚的看到,分区与文件系统没有直接关系。
内核会将磁盘和通过blk_add_partitions()解析出的磁盘的分区,都抽象成struct block_device
当内核执行mount()解析文件系统时,内核通过vfs_get_tree(),调用相关的fc->ops->get_tree()回调函数,从对应的struct block_device抽象的设备中,读取对应文件系统约定的block,完成super block数据的读取和解析
可以看到,由于内核将磁盘和磁盘的分区,都统一抽象成struct block_device,并且之后的数据交互都基于struct block_device暴露的接口进行。自然的,文件系统与分区并无直接关系
操作系统启动
这里以常用的grub2(Grand Unified Bootloader2)为例,参考grub官方文档
操作系统的启动逻辑可以抽象成非常简单的一个过程——CPU跳转到固定地址,执行对应的flat binary。其中,flat binary会完成必要的初始化工作(如加载内核镜像等),并执行内核代码
当然,对于不同的启动模式,具体细节差距会很大,其基本可以分为BIOS(Basic Input/Output System)和UEFI(Unified Extensible Firmware Interface)两种模式
BIOS
在BIOS下,操作系统的启动流程如下所示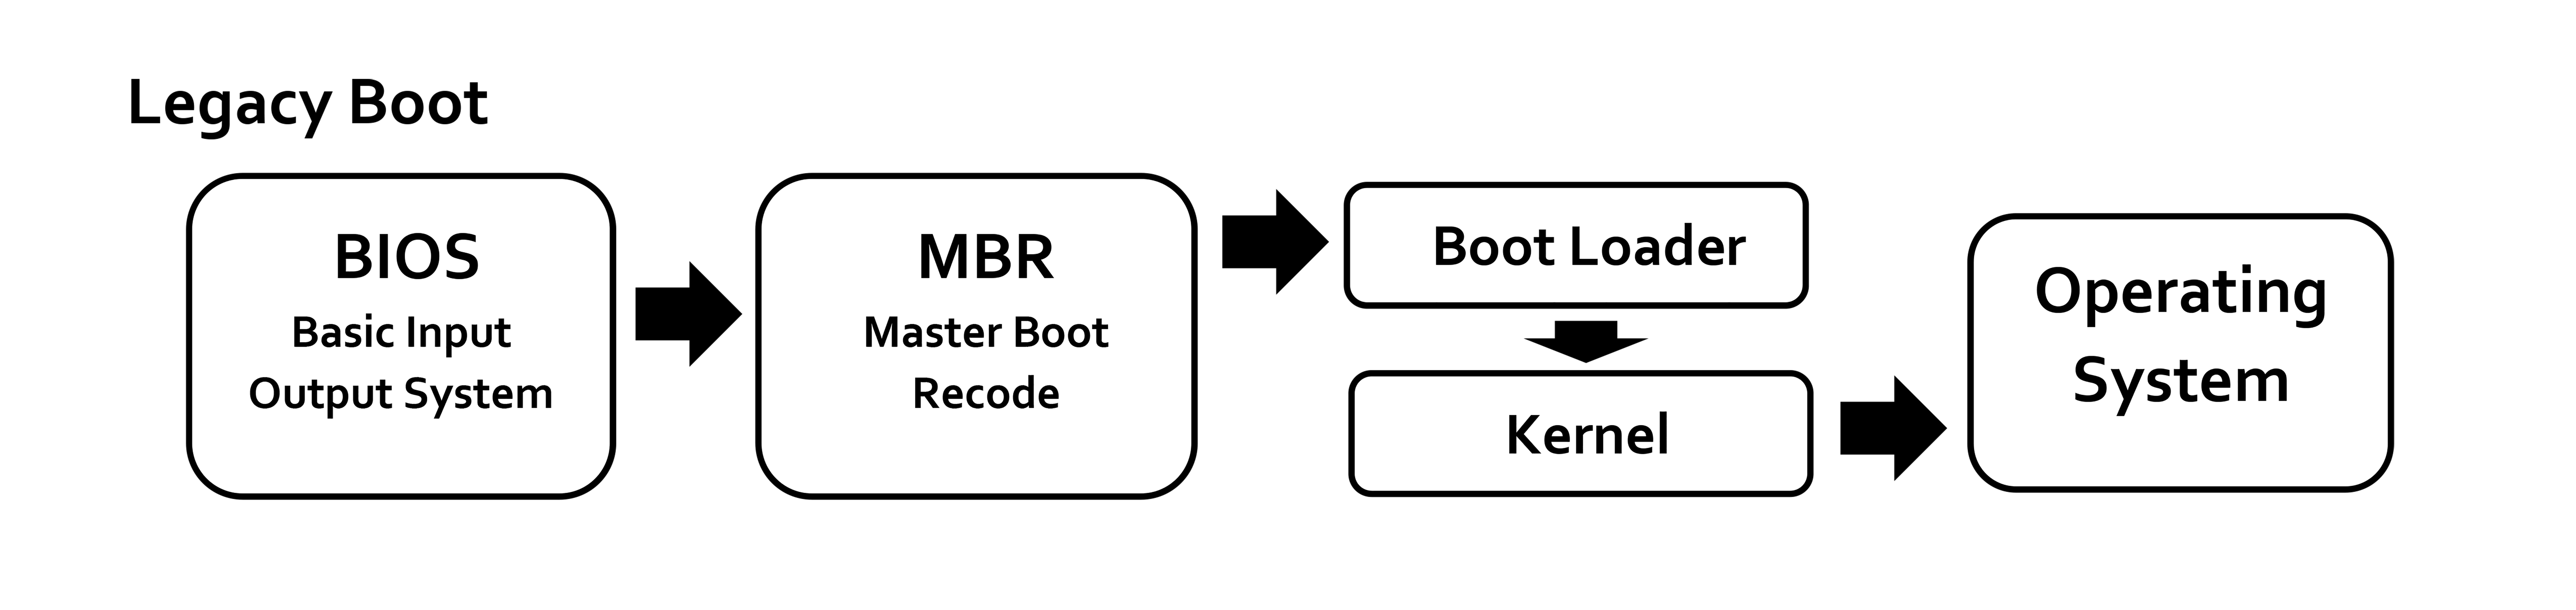
CPU上电后,会从0xffff0物理地址处,开始执行位于ROM的BIOS代码。
之后,BIOS会尝试寻找bootable device,即含有MBR分区的设备。
找到符合条件的设备后,载入磁盘的第一个扇区(即Master Boot Record)到0x07C00物理地址处,开始执行MBR,即BootLoader。
在BIOS中,该BootLoader的大小受到严格限制,因此其作用就是装载剩余的grub image至内存,而该grub image会加载必要的模块(如磁盘分区模块、文件系统模块)等,从而读取磁盘中的设置文件,并根据该设置文件加载内核并启动即可
UEFI
在UEFI下,操作系统的启动流程如下所示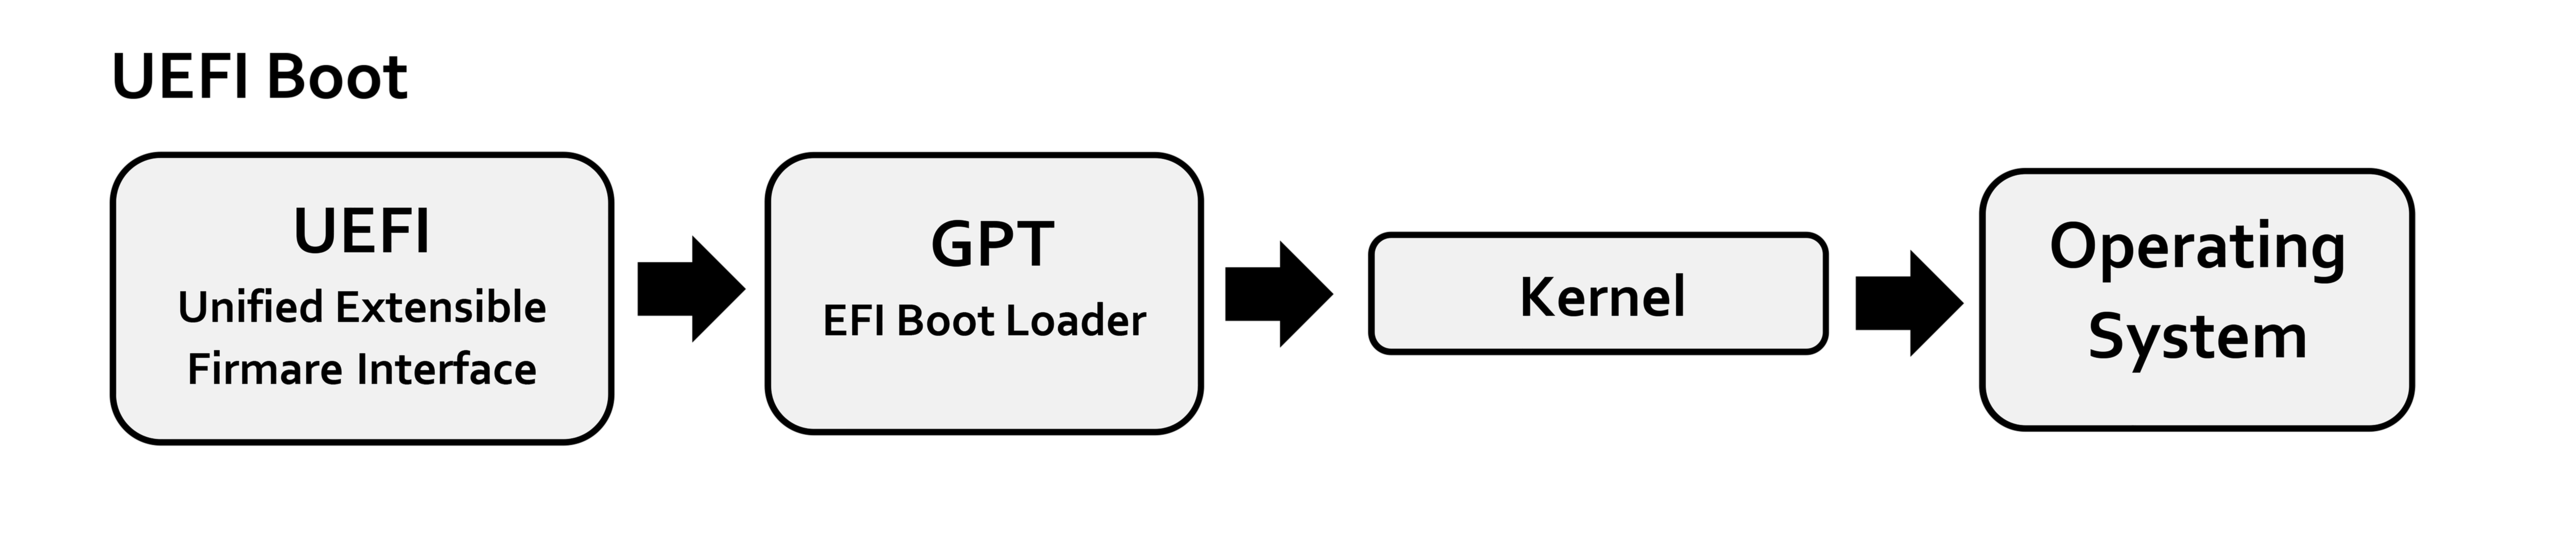
CPU上电后,会执行位于ROM的UEFI代码,其会在Driver Execution Environment阶段(UEFI执行的某一个阶段)加载必要的模块(诸如磁盘分区模块、文件系统模块等)
在完成UEFI代码执行后,不同于BIOS去查找bootable device,其会直接装载指定路径的BootLoader(UEFI此时可以识别磁盘分区和文件系统):如果NVRAM中存储有,则直接读取该信息并加载相关路径下的;否则加载默认路径{efi_system_partition}/EFI/BOOT/BOOT{machine_type}的BootLoader即可
在UEFI中,BootLoader没有大小限制,则其可以直接加载必要的模块(如磁盘分区模块、文件系统模块)等,从而读取磁盘中的设置文件,并根据该设置文件加载内核并启动即可
构建启动盘
BIOS
根据前面的分析,实际上在磁盘上需要安装BootLoader、grub image和相关的配置文件,即可完成启动盘的构建
- 磁盘分区
虽然这一步并不是必须的,但是平时使用时,我们都会将磁盘进行分区,如下所示1
2
3
4
5
6
7
8
9
10
11
12
13
14
15
16
17
18
19
20
21
22
23
24
25
26
27
28
29
30
31
32
33
34
35
36
37
38
39
40hawk@xiaoxin:~/Desktop$ sudo fdisk /dev/loop11
Welcome to fdisk (util-linux 2.34).
Changes will remain in memory only, until you decide to write them.
Be careful before using the write command.
Command (m for help): o
Created a new DOS disklabel with disk identifier 0x6df869f1.
Command (m for help): n
Partition type
p primary (0 primary, 0 extended, 4 free)
e extended (container for logical partitions)
Select (default p):
Using default response p.
Partition number (1-4, default 1):
First sector (2048-4194303, default 2048):
Last sector, +/-sectors or +/-size{K,M,G,T,P} (2048-4194303, default 4194303): +1G
Created a new partition 1 of type 'Linux' and of size 1 GiB.
Command (m for help): n
Partition type
p primary (1 primary, 0 extended, 3 free)
e extended (container for logical partitions)
Select (default p):
Using default response p.
Partition number (2-4, default 2):
First sector (2099200-4194303, default 2099200):
Last sector, +/-sectors or +/-size{K,M,G,T,P} (2099200-4194303, default 4194303):
Created a new partition 2 of type 'Linux' and of size 1023 MiB.
Command (m for help): w
The partition table has been altered.
Calling ioctl() to re-read partition table.
Syncing disks. - 初始化文件系统
这里在两个分区上分别初始化为FAT32文件系统和EXT2文件系统,从而存储启动设置等文件1
2
3
4
5
6
7
8
9
10
11
12
13hawk@xiaoxin:~/Desktop$ sudo mkfs.vfat -F 32 /dev/loop11p1
mkfs.fat 4.1 (2017-01-24)
hawk@xiaoxin:~/Desktop$ sudo mkfs.ext2 /dev/loop11p2
mke2fs 1.45.5 (07-Jan-2020)
Creating filesystem with 261888 4k blocks and 65536 inodes
Filesystem UUID: b7f11d0d-d3be-435d-ba3c-1572ecf26771
Superblock backups stored on blocks:
32768, 98304, 163840, 229376
Allocating group tables: done
Writing inode tables: done
Writing superblocks and filesystem accounting information: done - 安装BootLoader和grub image
即调用grub-install,命令如下所示这里简单解释一下grub-install命令中的部分参数1
2
3
4
5
6
7
8
9
10
11
12
13
14hawk@xiaoxin:~/Desktop$ sudo mount -o rw /dev/loop11p1 mnt/
hawk@xiaoxin:~/Desktop$ sudo grub-install --target=i386-pc --boot-directory=mnt /dev/loop11
Installing for i386-pc platform.
Installation finished. No error reported.
hawk@xiaoxin:~/Desktop$ tree -d mnt/
1 [error opening dir]
mnt/
└── grub
├── fonts
└── i386-pc
3 directories- —boot-directory=mnt: 即grub设置文件被安装的位置,这部分数据是grub已经加载完相关模块(如磁盘分区模块、文件系统模块)后加载的,因此参数值是文件系统的目录项名称
- /dev/loop11: 即BootLoader和部分grub image将被安装的磁盘。由于BootLoader和部分grub image会被安装到磁盘的起始扇区处,和分区无关,因此参数值是磁盘设备,而非磁盘分区
设置配置文件
grub在启动时,会读取{boot_directory}/grub/grub.cfg的配置文件,从而执行相应的操作
因此,我们需要在相关的路径下,参考grub官方文档初始化一个grub.cfg,如下所示1
2
3
4
5
6
7
8
9
10
11
12
13
14hawk@xiaoxin:~/Desktop$ lsblk -o +UUID
NAME MAJ:MIN RM SIZE RO TYPE MOUNTPOINT UUID
loop11 7:11 0 2G 0 loop
├─loop11p1
│ 259:5 0 1G 0 part /home/hawk A6E8-C20A
└─loop11p2
259:6 0 1023M 0 part b7f11d0d-d3be-435d-ba3c-1572ecf26771
hawk@xiaoxin:~/Desktop$ cat mnt/grub/grub.cfg
menuentry "v6.0-rc6" {
insmod /grub/i386-pc/ext2.mod
search --fs-uuid --set=root b7f11d0d-d3be-435d-ba3c-1572ecf26771
linux /v6.0-rc6/bzImage
}可以看到,grub.cfg有一个菜单项,其会首先加载相关的模块(以{boot_directory}作为根目录),然后尝试切换根目录到指定uuid的文件系统实例,加载相应路径下的内核。而相关的文件系统实例内容如下所示
1
2
3
4
5
6
7
8hawk@xiaoxin:~/Desktop$ sudo mount -o rw /dev/loop11p2 disk
hawk@xiaoxin:~/Desktop$ tree disk
disk
├── lost+found [error opening dir]
└── v6.0-rc6
└── bzImage
2 directories, 1 file此时,一个启动盘已经构建好了,可以参考QEMU官方文档,使用如下所示的QEMU启动脚本进行测试
1
2
3
4
5
6
7hawk@xiaoxin:~/Desktop$ cat start.sh
#!/bin/sh
qemu-system-x86_64 \
-drive file=disk.img,index=0,media=disk
hawk@xiaoxin:~/Desktop$ ./start.sh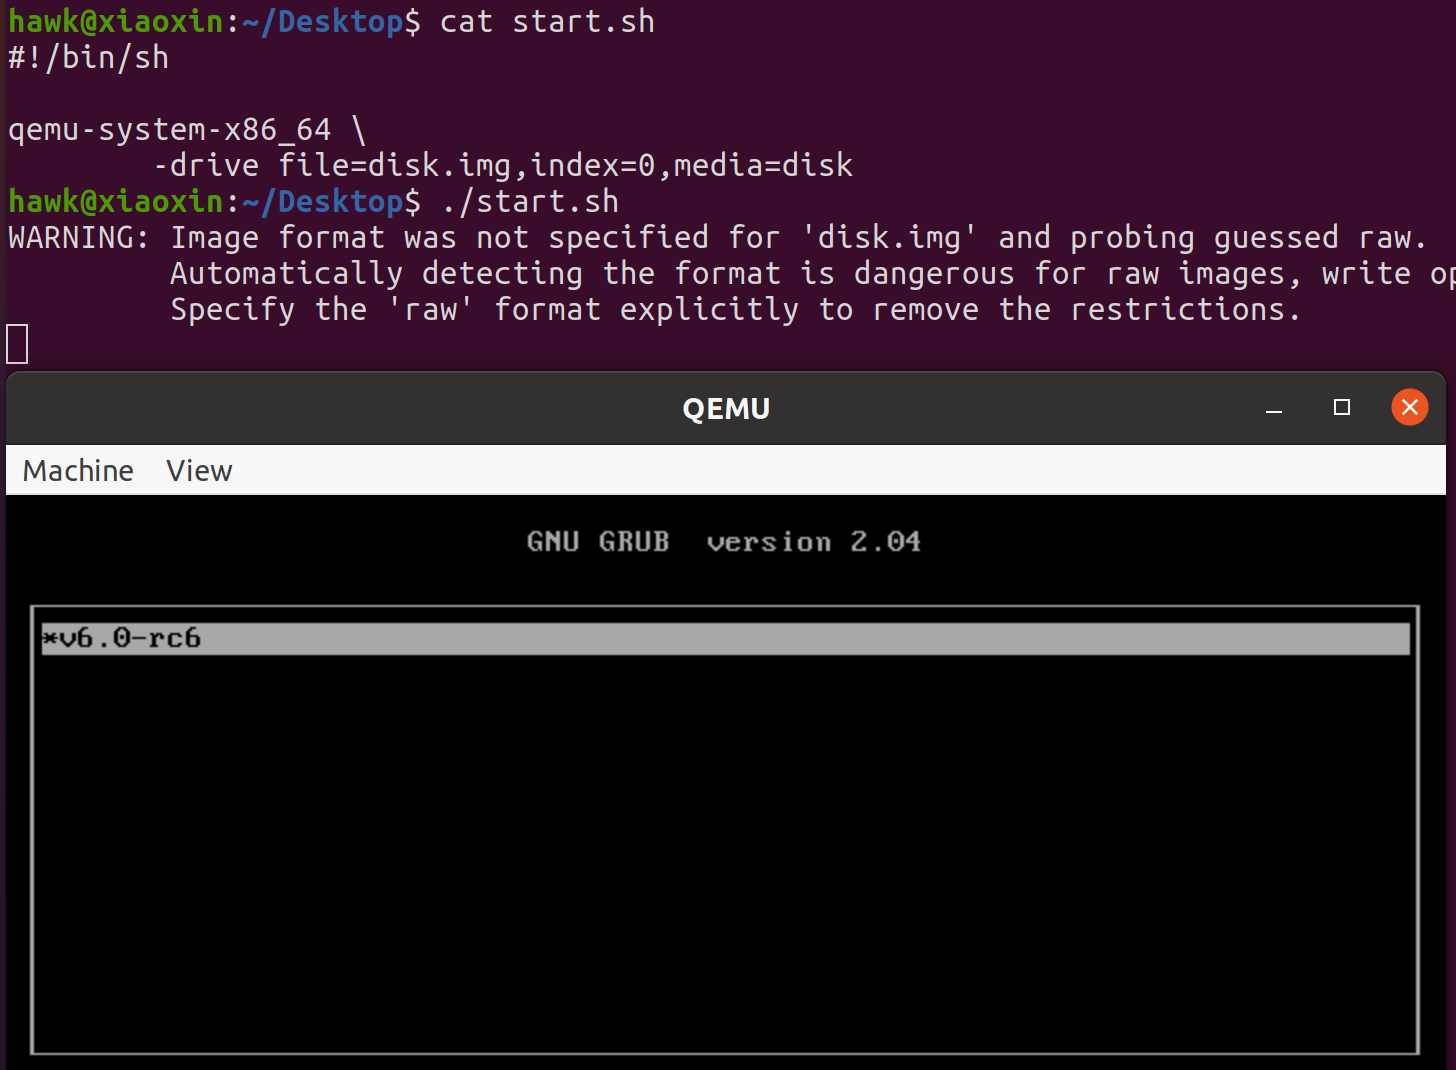
创建根文件系统
如果没有指定根文件系统,则Linux内核无法正常加载文件系统模块,如下所示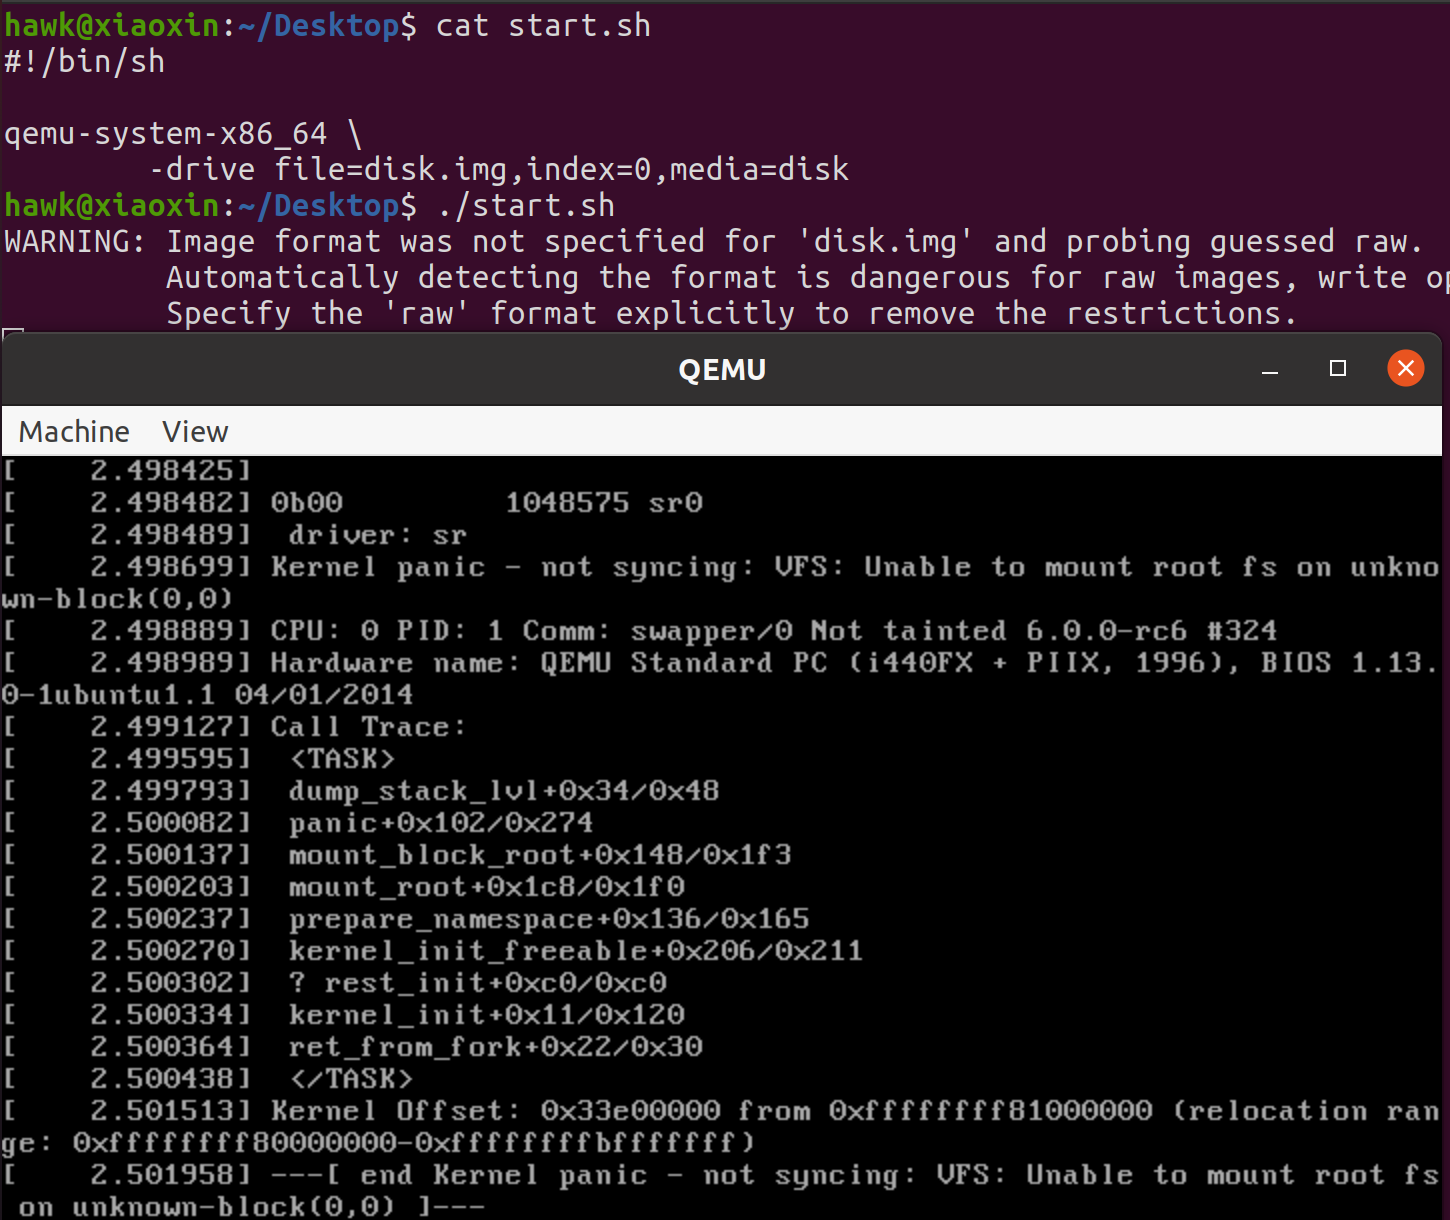
这里使用busybox,构建一个简单的根文件目录,并更新相关的设置文件即可,如下所示
1
2
3
4
5
6
7
8
9
10
11
12
13
14
15
16
17hawk@xiaoxin:~/Desktop/busybox-1.35.0/_install$ ls
bin init linuxrc sbin usr
hawk@xiaoxin:~/Desktop/busybox-1.35.0/_install$ cat init
#!/bin/sh
exec /bin/sh
hawk@xiaoxin:~/Desktop/busybox-1.35.0/_install$ sudo sh -c 'find . | cpio -o --format=newc > /home/hawk/Desktop/disk/v6.0-rc6/rootfs.cpio'
5390 blocks
hawk@xiaoxin:~/Desktop/busybox-1.35.0/_install$ cat ~/Desktop/mnt/grub/grub.cfg
menuentry "v6.0-rc6" {
insmod /grub/i386-pc/ext2.mod
search --fs-uuid --set=root b7f11d0d-d3be-435d-ba3c-1572ecf26771
linux /v6.0-rc6/bzImage
initrd /v6.0-rc6/rootfs.cpio
}此时,可以正常进入Linux的bash,如下图所示

UEFI
类似BIOS,实际上在磁盘上需要安装BootLoader和相关的配置文件,即可完成启动盘的构建
- 磁盘分区
UEFI启动时必须需要有EFI分区,因此将磁盘进行如下分区1
2
3
4
5
6
7
8
9
10
11
12
13
14
15
16
17
18
19
20
21
22
23
24
25
26
27
28
29
30
31
32
33
34
35
36
37
38
39
40
41
42
43
44
45
46
47
48
49
50
51hawk@xiaoxin:~/Desktop$ sudo losetup -fP disk.img
hawk@xiaoxin:~/Desktop$ sudo losetup -a | grep "disk.img"
/dev/loop11: [66306]:1852129 (/home/hawk/Desktop/disk.img)
hawk@xiaoxin:~/Desktop$ sudo fdisk /dev/loop11
Welcome to fdisk (util-linux 2.34).
Changes will remain in memory only, until you decide to write them.
Be careful before using the write command.
Command (m for help): g
Created a new GPT disklabel (GUID: 17082A27-61F6-0A4B-8D3C-2A685B71BA7C).
The old dos signature will be removed by a write command.
Command (m for help): n
Partition number (1-128, default 1):
First sector (2048-4194270, default 2048):
Last sector, +/-sectors or +/-size{K,M,G,T,P} (2048-4194270, default 4194270): +256M
Created a new partition 1 of type 'Linux filesystem' and of size 256 MiB.
Partition #1 contains a vfat signature.
Do you want to remove the signature? [Y]es/[N]o: y
The signature will be removed by a write command.
Command (m for help): n
Partition number (2-128, default 2):
First sector (526336-4194270, default 526336):
Last sector, +/-sectors or +/-size{K,M,G,T,P} (526336-4194270, default 4194270):
Created a new partition 2 of type 'Linux filesystem' and of size 1.8 GiB.
Command (m for help): t
Partition number (1,2, default 2): 1
Partition type (type L to list all types): 1
Changed type of partition 'Linux filesystem' to 'EFI System'.
Command (m for help): t
Partition number (1,2, default 2):
Partition type (type L to list all types): 24
Changed type of partition 'Linux filesystem' to 'Linux root (x86-64)'.
Command (m for help): w
The partition table has been altered.
Calling ioctl() to re-read partition table.
Syncing disks. - 初始化文件系统
这里在两个分区上初始化为FAT32文件系统和EXT2文件系统,从而存储启动设置等文件1
2
3
4
5
6
7
8
9
10
11
12
13
14hawk@xiaoxin:~/Desktop$ sudo mkfs.vfat -F 32 /dev/loop11p1
mkfs.fat 4.1 (2017-01-24)
hawk@xiaoxin:~/Desktop$ sudo mkfs.ext2 /dev/loop11p2
mke2fs 1.45.5 (07-Jan-2020)
Discarding device blocks: done
Creating filesystem with 458491 4k blocks and 114688 inodes
Filesystem UUID: d59e6ba7-6bce-4cbe-ab6f-44d778c3fbe6
Superblock backups stored on blocks:
32768, 98304, 163840, 229376, 294912
Allocating group tables: done
Writing inode tables: done
Writing superblocks and filesystem accounting information: done - 安装BootLoader
即调用grub-install,命令如下所示这里简单解释一下grub-install命令中的部分参数1
2
3
4
5
6
7
8
9
10
11
12
13
14
15
16hawk@xiaoxin:~/Desktop$ sudo mount -o rw /dev/loop11p1 mnt/
hawk@xiaoxin:~/Desktop$ sudo grub-install --efi-directory=mnt --boot-directory=mnt --removable
Installing for x86_64-efi platform.
Installation finished. No error reported.
hawk@xiaoxin:~/Desktop$ tree -d mnt/
1 [error opening dir]
mnt/
├── EFI
│ └── BOOT
└── grub
├── fonts
└── x86_64-efi
5 directories- —boot-directory=mnt: 即grub设置文件被安装的位置,这部分数据是grub已经加载完相关模块(如磁盘分区模块、文件系统模块)后加载的,因此参数值是文件系统的目录项名称
- —efi-directory=mnt: 即BootLoader被安装的路径。不同于BIOS,UEFI可以识别磁盘分区和文件系统,因此参数值是BootLoader所在的文件系统的目录项名称
设置配置文件
grub在启动时,会读取{boot_directory}/grub/grub.cfg的配置文件,从而执行相应的操作
因此,我们需要在相关的路径下,参考grub官方文档初始化一个grub.cfg,如下所示1
2
3
4
5
6
7
8
9
10
11
12hawk@xiaoxin:~/Desktop$ lsblk -o +UUID
NAME MAJ:MIN RM SIZE RO TYPE MOUNTPOINT UUID
loop11 7:9 0 2G 0 loop
├─loop11p1 259:5 0 256M 0 part /home/hawk/Desktop/mnt C573-58EB
└─loop11p2 259:6 0 1.8G 0 part d59e6ba7-6bce-4cbe-ab6f-44d778c3fbe6
hawk@xiaoxin:~/Desktop$ cat mnt/grub/grub.cfg
menuentry "v6.0-rc6" {
insmod /grub/x86_64-efi/ext2.mod
search --fs-uuid --set=root d59e6ba7-6bce-4cbe-ab6f-44d778c3fbe6
linux /v6.0-rc6/bzImage
}可以看到,grub.cfg有一个菜单项,其会首先加载相关的模块(以{boot_directory}作为根目录),然后尝试切换根目录到指定uuid的文件系统实例,加载相应路径下的内核。而相关的文件系统实例内容如下所示
1
2
3
4
5
6
7
8
9
10hawk@xiaoxin:~/Desktop$ sudo mount -o rw /dev/loop11p2 disk
hawk@xiaoxin:~/Desktop$ tree disk
disk
├── lost+found [error opening dir]
└── v6.0-rc6
└── bzImage
2 directories, 1 file
hawk@xiaoxin:~/Desktop$这里需要特别说明,需要按照Linux官方文档,编译支持UEFI的Linux内核。此时,一个启动盘已经构建好了,可以参考QEMU官方文档和UEFI固件项目,使用如下所示的QEMU启动脚本进行测试
1
2
3
4
5
6
7
8
9hawk@xiaoxin:~/Desktop$ cat start.sh
#!/bin/sh
qemu-system-x86_64 \
-bios /usr/share/ovmf/OVMF.fd \
-m 4G \
-drive file=disk.img,index=0,media=disk
hawk@xiaoxin:~/Desktop$ ./start.sh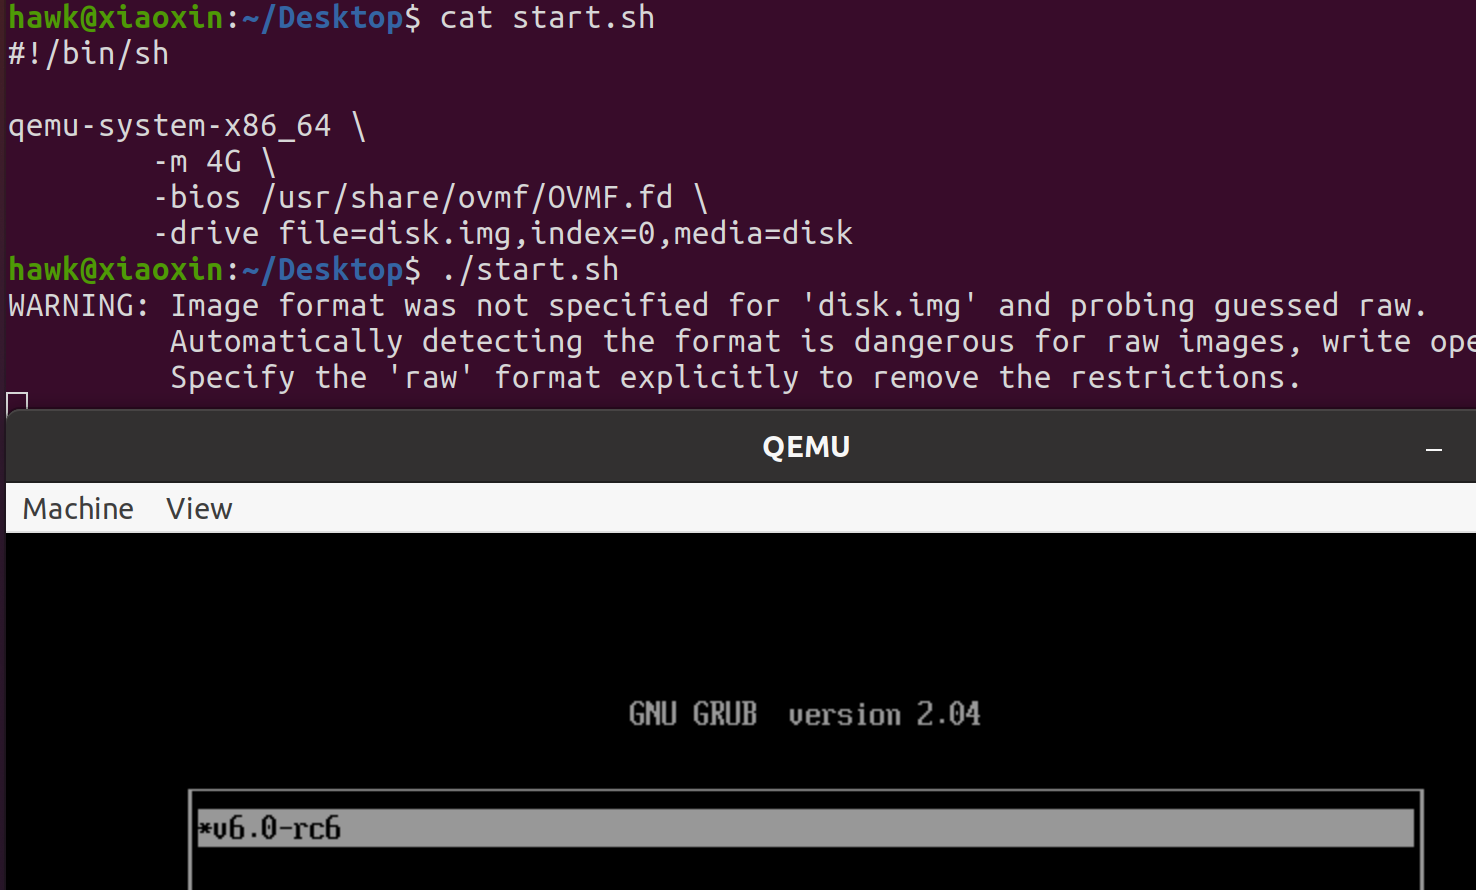
创建根文件系统
如果没有指定根文件系统,则Linux内核无法正常加载文件系统模块,如下所示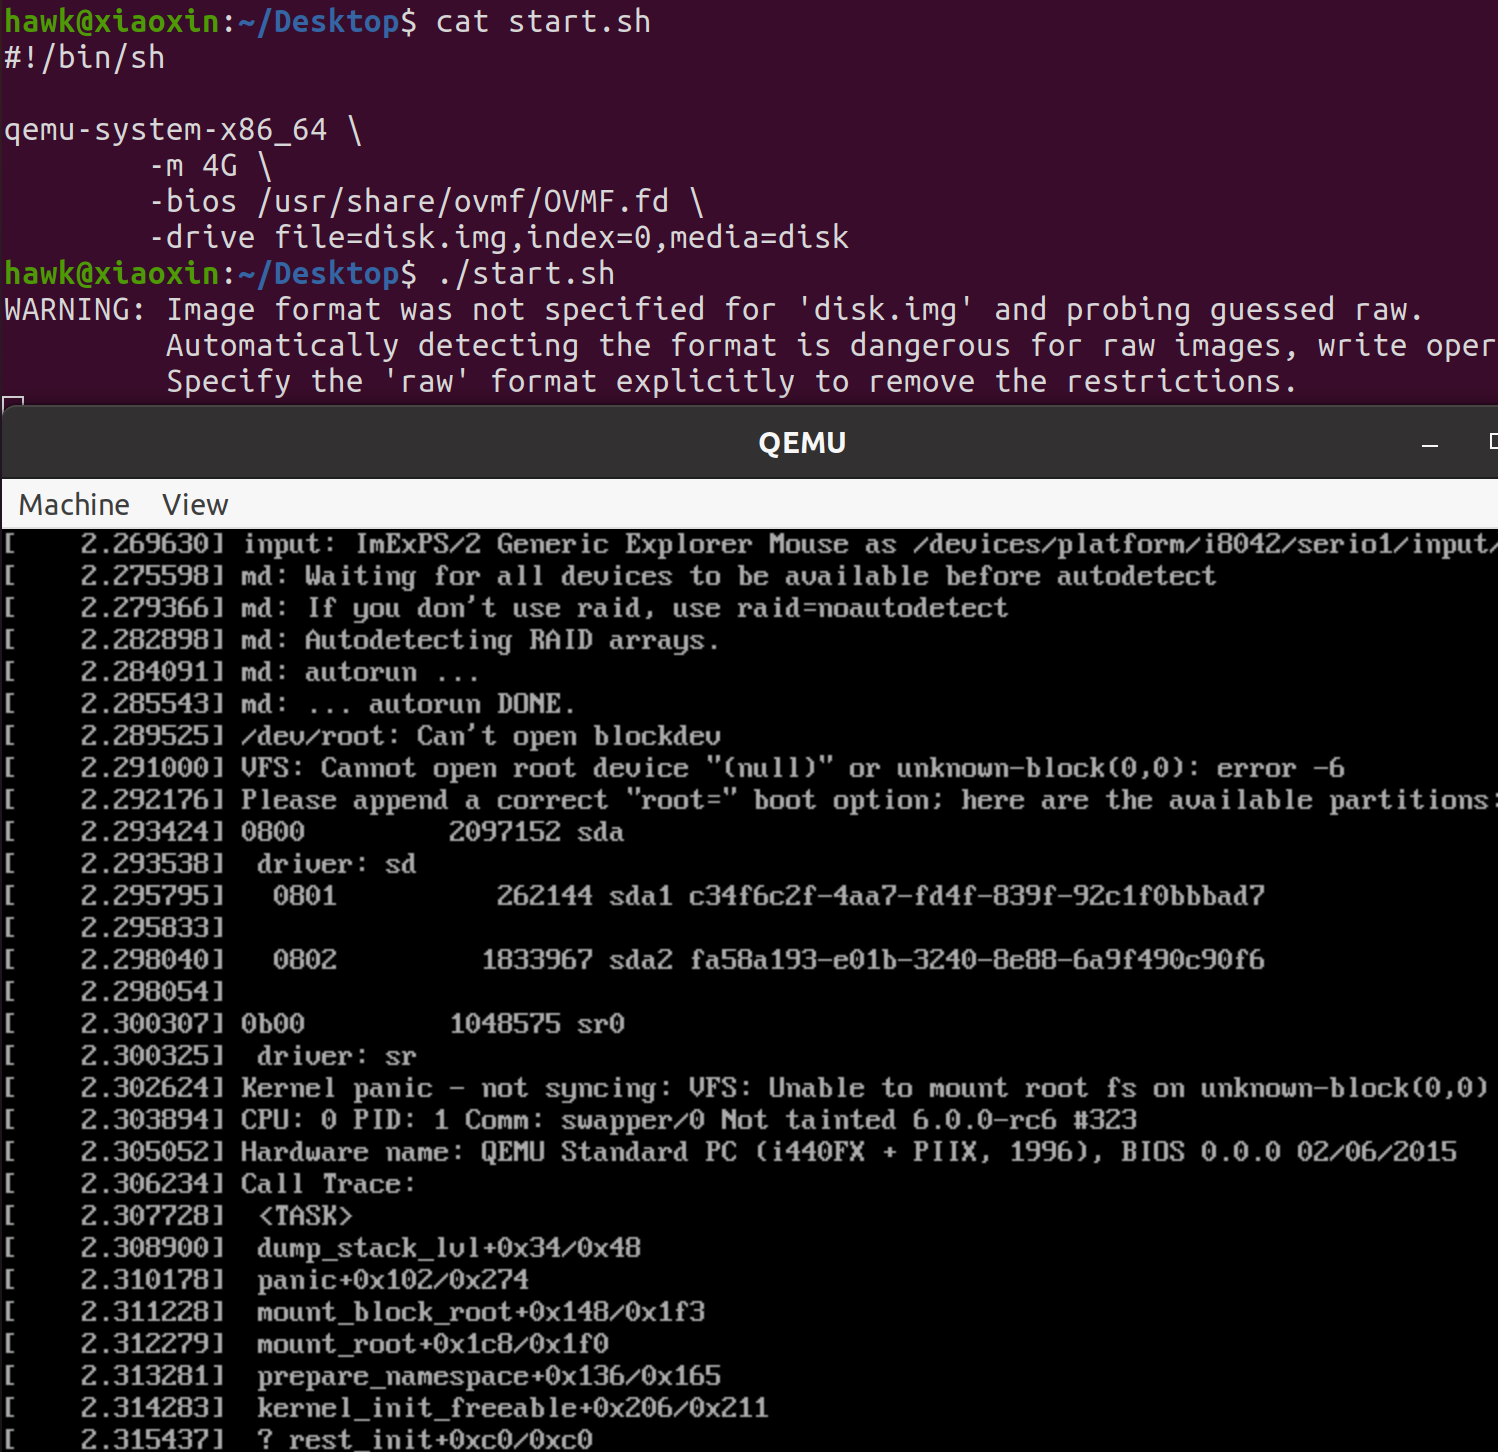
这里使用busybox,构建一个简单的根文件目录,并更新相关的设置文件即可,如下所示
1
2
3
4
5
6
7
8
9
10
11
12
13
14
15
16
17hawk@xiaoxin:~/Desktop/busybox-1.35.0/_install$ ls
bin init linuxrc sbin usr
hawk@xiaoxin:~/Desktop/busybox-1.35.0/_install$ cat init
#!/bin/sh
exec /bin/sh
hawk@xiaoxin:~/Desktop/busybox-1.35.0/_install$ sudo sh -c 'find . | cpio -o --format=newc > /home/hawk/Desktop/disk/v6.0-rc6/rootfs.cpio'
5390 blocks
hawk@xiaoxin:~/Desktop/busybox-1.35.0/_install$ cat ~/Desktop/mnt/grub/grub.cfg
menuentry "v6.0-rc6" {
insmod /grub/i386-pc/ext2.mod
search --fs-uuid --set=root d59e6ba7-6bce-4cbe-ab6f-44d778c3fbe6
linux /v6.0-rc6/bzImage
initrd /v6.0-rc6/rootfs.cpio
}此时,可以正常进入Linux的bash,如下图所示